
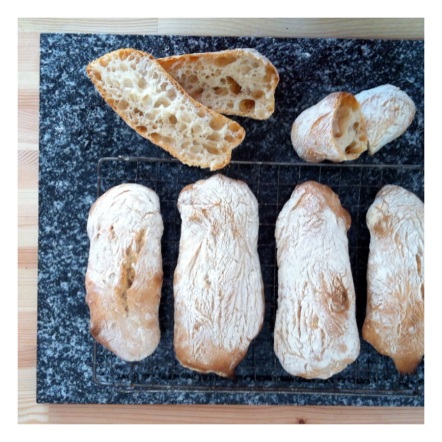
Recently I have been focusing my attention on blogs and online forums, something I couldn’t afford to do previously, and realized that bread baking can be considered a form of addiction, and I’m not alone. Not that I thought of being unique in this kind of passionate obession but the awareness that out there many other people suffer from the same form of dependence can only make me feel happy and less alone. The manic (sourdough) street preacher found new places where to express freely her love for baking, finally in her element at last! I have been meeting a lot of people who have a burning passion for the communion of flour, water and sourdough and who devote much of their time obtaining not only a product that is edible, but beautiful loaves carriers of beauty and emotions. True craftsmen/women an artists of real bread, which raise the bar every time and push me to try to improve and challenge my fears, day by day. Ciabatta was the first recipe that faced me with several questions and problems, such as: How will I achieve that wonderful texture, such an alveolation? And the crispy crust ? Is it humanly possible, not having a kneading machine, to obtain such a well-strung dough? Until then, I devoted myself to bakery with passion, but within the confines of recipes that provide a reassuring homemade bread, recipes which are safe and successful. After my encounter with the sourdough’s world I started studying a bit more and pushing my boundaries. The first ciabatta recipe I tried, two years ago, was Antonella Scialdone’s and I was pleasantly surprised. The problem was my high hydration dough handling…often a disaster. So I tried Vittorio’s recipe, with satisfactory results but never achieving the beautiful alveolation found in baker’s ciabattas. At one point I also developed a recipe that would allow me to handle the dough more easily, but still unsatisfactory regarding the presence of the coveted cavities. Ciabatta came back haunting me when among the members of facebook’s group La Pasta Madre exploded the trend of baking ciabattas from Raffaele Pignataro’s blog. I admit not having tried his recipe yet, initially because I had no time and simply decided to whip up a recipe that I could make in a day without long waiting times between the dough mixing and baking of the bread. But some of his tips came useful to me, as poking the ciabatta before the final proofing, turning them before baking and oven temperatures. As sometimes happens at my first attempt I had beginner’s luck and the result was very good. Result that I have attempted to replicate, repeatedly failing. Probably because I have forgot to write down on my notes a little amount of flour added later on while working. The ciabatta challenge had made its way into my mind, and every other day I tried different amounts of flour and water, but without any luck. Too flat, too wet, nice but not proper ciabattas. Providential was the return of my parents from vacation, finally I had someone who could bring me across the border to buy flour in Italy! Among my purchases I got a package of what they call manitoba flour, a strong flour known for its high content of gluten the key factor that favors the rise and therefore the desired holes. The same evening I started to knead my 4th round and the unexpected happened. All this without following recipe, just listening to my guts and playing with the dough. The result is excellent, and my happiness was such I almost burst into tears in front of the oven when I realized that the ciabattas were rising and inflated almost three times their volume! I also hope you too manage to get the same results. I can only tell you one thing, do not ever throw in the towel and persevere, always, because when the results are there they sweep away all the disappointments. Happy baking!
Ciabatta the fourth
130 gr levain, 100% hydration, refreshed once
0 250 gr AP flour (11% protein)
100 gr strong flour (13% protein)
6 gr salt
300 gr water
Sift together the flours.
Dissolve the levain in the water and add 250 grams of flour, cover with foil and rest for 30′.
Add the remaining flour and salt, mix directly into the bowl using a spatula.
Cover the bowl with plastic wrap and rest for 30′.
Do more foldings (I did two sets of folds along the entire circumference of the dough) with the help of the spatula, cover with foil and rest for 30′.
Repeat the folds and rest.
After this rest you should find that the dough is well-strung, if not try to repeat folds and rest 1-2 times.
Cover the bowl with plastic wrap and refrigerate 16 hours.
Transfer the dough on a floured surface and quickly fold it, taking care you do not crush the dough too much .
Flour well your hands and the surface you are working on to be able handle the dough properly. Sprinkle with flour the entire surface of the dough after making the folds, flour it under and to the sides so that it won’t stick to the work surface and the clingfilm with which you will cover it.
Stand covered with clingfilm and cloth for 60′.
Using a spatula cut the ciabattas, 6 weighting 95 grams or 3 weighting 190 g.
Cut them more or less equal, if not dramatically larger or smaller between them is not a big problem during baking.
When you cut and give the shape make sure the ciabattas are sitting on a well floured surface and flour all the surface, especially the sides where you cut the dough, so that you will avoid it sticking on your hands and on the surface.
Do not scrambled too much the dough, try to cut it so that it has a shape that is more or less right .
Poke the ciabattas very gently with your fingertips, sprinkle with flour on the sides and top and cover with plastic wrap and towel, for 30′.
Here you’ll find a very good video that can help you with those steps, please do take a little time to look at it!
Meanwhile, preheat oven to maximum power, up to 275° C , leaving in the baking tray on which you are going to bake the ciabattas.
I set the oven on hot air, if your oven is static simply put a pot full of water on the bottom of the oven during preheating and for the first 10′ of baking, making sure that the last 5′-10′ of baking the oven door is slightly open (you can slip the handle of a wooden spoon and put it sideways).
When the ciabattas are ready, remove the baking tray, sprinkle with plenty of flour, and place the ciabattas onto it, turning them gently on the opposite side, the side they were resting upon now facing up.
Bake at 275° C for 10′, lower to 250 ° C for 1 ‘ and 200° C for 8’.
The ciabattas are ready when golden and emit a hollow sound when tapped on the bottom.

Ciabatta la quarta
È incredibile come negli ultimi mesi, concentrando la mia attenzione su blog e forum online, mi sono resa conto che la panificazione può essere considerata una vera e propria forma di dipendenza. Certo non che prima credessi di essere unica al mondo, ma la consapevolezza che là fuori ci sono davvero tante persone affette dalla mia stessa forma di dipendenza non può che rendermi felice e farmi sentire un poco meno sola. L’invasata della pasta madre ha trovato spazi dove sguazzare nel proprio elemento, finalmente! Sto conoscendo un sacco di persone che hanno una passione bruciante, che dedicano gran parte del loro tempo non solo all’ottenimento di un prodotto che sia commestibile, ma che possa suscitare vere e proprie emozioni. Veri artigiani/artisti del pane, che innalzano ogni volta l’asticella e mi spingono a provare a migliorarmi e sfidare le mie paure, giorno per giorno. La ciabatta è stata la prima ricetta che mi ha davvero messo di fronte a diverse domande, come ottenere quella stupenda alveolatura? E la crosta croccante? È umanamente possibile, non possedendo una planetaria, ottenere un impasto ben incordato? Fino ad allora mi dedicavo alla panificazione sì con passione, ma rimanendo nei confini delle ricette conosciute e sicure che danno un pane casalingo rassicurante e di riuscita sicura. Dopo la ciabatta ho iniziato ad avere il tarlo. La prima ricetta che provai, 2 anni fa, fu quella di Antonella Scialdone e rimasi piacevolmente colpita. Il problema era la mia gestione dell’impasto ad alta idratazione…spesso un disastro. Così ho provato anche la ricetta di Vittorio, anche lì con risultati soddisfacenti ma mai l’alveolatura stupenda riscontrata nei prodotti da forno. Ad un certo punto ho anche sviluppato una ricetta che mi permettesse d manipolare con più facilità l’impasto, ma sempre poco soddisfacente per quel che riguarda la presenza delle agognate cavità. Il tarlo della ciabatta mi è tornato con l’esplosione, tra gli iscritti del gruppo facebook La Pasta Madre, di una ricetta particolarmente interessante di Raffaele Pignataro. Ammetto di non averla provata, inizialmente perché non avendo tempo ho deciso semplicemente di improvvisare una ricetta da fare in giornata senza lunghi tempi di attesa tra impasto e infornata. Ho seguito però i suoi consigli in merito alla formazione delle ciabatte e di rivoltarle al momento della cottura, oltre che aver preso spunto dalla sua ricetta per le temperature e tempi di cottura. Come a volte capita, in inglese si dice beginners luck, il risultato è stato molto buono. Un risultato che ho tentato di replicare fallendo ripetutamente in quanto temo di aver tralasciato negli appunti una quantità di farina aggiunta in seguito all’autolisi. Ma oramai la sfida della ciabatta si era fatta largo nella mia mente, e a giorni alterni ho provato diverse quantità di farina e acqua, senza fortuna alcuna. Provvidenziale è stato il rientro dei miei genitori dalle vacanze, finalmente avevo qualcuno che mi potesse accompagnare oltreconfine per comprare delle farine! Tra i miei acquisti un pacchetto di farina manitoba, conosciuta per l’alto contenuto di glutine, fattore che favorisce la lievitazione e dunque i desiderati buchi. La sera stessa mi sono messa ad impastare la mia 4° prova, dall’inaspettato successo. Il tutto senza seguire ricetta, andando a naso ed ascoltando pancia e impasto. Il risultato è eccellente, tanto che poco mancava che scoppiassi a piangere davanti al forno quando mi sono accorta che le ciabatte erano effettivamente lievitate e gonfiate quasi tre volte il loro volume! Spero anche voi riusciate ad avere gli stessi risultati. Posso solo dirvi una cosa, non gettate mai la spugna e perseverate, sempre, perché quando i risultati ci sono spazzano via tutte le delusioni e i nervosismi. Buona panificazione!
Ciabatta, la quarta
130 gr licoli 100% rinfrescato una volta
400 gr farina 00 di homebaker
6 gr sale
300 gr acqua
Setacciare insieme le farine.
Sciogliere il licoli nell’acqua e aggiungere 250 gr della farina setacciata, coprire con pellicola e riposare 30’.
Aggiungere la farina restante ed il sale, mischiare direttamente nella ciotola aiutandosi con una spatola.
Coprire la ciotola con pellicola e riposare 30’.
Fare più pieghe (io ho fatto due serie di pieghe percorrendo tutta la circonferenza dell’impasto) con l’aiuto della spatola, coprire con la pellicola e riposare 30’.
Ripetere con le pieghe e riposo.
Dopo questo riposo bisognerebbe riscontrare che l’impasto è ben incordato, non fosse così provare a ripetere pieghe e riposo 1-2 volte.
Coprire la ciotola con la pellicola e riposare in frigorifero 16 ore.
Rovesciare l’impasto su un piano infarinato e fare velocemente delle pieghe senza schiacciare troppo l’impasto.
Consiglio di infarinarsi le mani per maneggiare l’impasto e spolverare bene tutta la superficie dell’impasto subito dopo aver fatto le pieghe per questa operazione, anche sotto e ai lati dimodoché non si attacchi al piano di lavoro e alla pellicola con cui lo copriremo.
Riposare coperto da pellicola e canovaccio per 60’.
Aiutandosi con un tarocco tagliare le ciabattine, ne vengono 6 da 95 grammi oppure 3 più grandi da 190 gr.
Oppure fate semplicemente come me e tagliatele più o meno uguali, se non sono drammaticamente più grandi o piccole tra loro non è un grande problema durante la cottura.
Quando tagliate e date la forma da ciabatta assicuratevi il piano di lavoro sia ben infarinato e soprattutto i lati dove tagliate l’impasto, così eviterete che si appiccichino sulle mani e sul piano.
Non strapazzate troppo l’impasto, mentre lo tagliate cercate di fare in modo che abbia una forma più o meno giusta.
Schiacciate le ciabatte molto delicatamente con i polpastrelli, spolverate con farina sui lati e sopra e coprite con pellicola e canovaccio, per 30’.
Consiglio vivamente di guardare questo utilissimo video di Raffaele Pignataro per comprendere esattamente come trattare l’impasto, prendevi un po’ di tempo per studiarlo a modo ;).
Nel frattempo preriscaldate in forno a massimo della potenza, fino a 275°C, lasciando a scaldare la teglia sulla quale andrete a cuocere le ciabatte.
Io ho impostato il forno sulla modalità aria calda, se il vostro forno fosse semplicemente statico mettete un pentolino pieno di acqua sulla parte bassa del forno durante il preriscaldamento e i 10’ successivi e assicuratevi che gli ultimi 5’-10’ la cottura avvenga con lo sportellino leggermente aperto (potete infilare il manico di un mestolo di legno, messo lateralmente).
Quando le ciabatte sono pronte togliete la teglia, spolveratela con abbondante farina, rigirate le vostre ciabatte velocemente e posatele sulla teglia.
Infornate e cuocete a 275°C per 10’, abbassate a 250°C per 10’ e 200°C per 8’.
Le ciabatte son pronte quando belle dorate ed emettono un suono sordo quando battute con la nocca sul fondo.
